Solar Panel Anatomy: Key Components You Need to Know
If you’ve ever looked at a solar panel and wondered what’s actually inside that black rectangle, you’re not alone. The main components of a solar panel work together like a carefully engineered sandwich: each layer has a specific job, and skipping or cheaping out on any one of them shortens the panel’s life or kills its output. Understanding what those layers are and why they matter helps you pick the right panel, avoid common failures, and get the most out of your system for decades.
Manufacturer specifications show that a typical 400‑watt residential panel contains about 60 to 144 individual solar cells, each protected by tempered glass, a polymer backsheet, and multiple encapsulant films. Per IEC 61215 testing, these layers must survive 25 years of outdoor exposure, hail, UV, humidity, thermal cycling, without delaminating or letting moisture in. So let’s open up that sandwich and look at each ingredient.
Quick Answer
A solar panel has six main layers. Tempered glass protects the front. EVA encapsulant bonds everything together.
Photovoltaic cells generate electricity. A backsheet seals the rear. An aluminum frame adds structure.
A junction box with bypass diodes safely routes the power.
Why This Topic Works Best as a Visual Walkthrough
A diagram shows the cross‑section far more clearly than text alone. If you search for “solar panel cross section labeled” on any image site, you’ll see the glass on top, then a clear plastic sheet, then a grid of blue or black cells, then another plastic sheet, then a white or black backing, all held in a metal frame. That visual instantly answers “what’s inside?” in a way that paragraphs struggle to match.
The image below gives you the complete stack at a glance. Keep it open as a reference while you read the sections that follow.
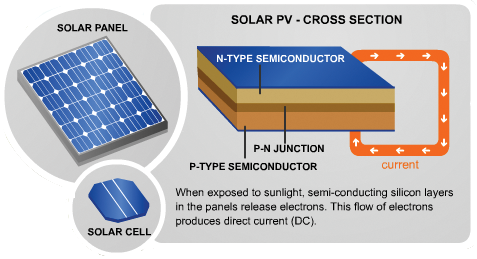
Image source: Bing (Web, fair‑use with source credit)
A Quick Mental Model: The Solar Panel Cross‑Section
Think of the panel as a five‑layer stack, starting at the top where sunlight hits.
| Layer | Material | Primary Job |
|---|---|---|
| 1 – Cover | Tempered glass | Protect cells from impact, let light through |
| 2 – Top encapsulant | EVA (ethylene‑vinyl acetate) | Bond glass to cells, block moisture |
| 3 – Solar cells | Silicon wafers (mono or poly) | Convert sunlight into DC electricity |
| 4 – Bottom encapsulant | EVA | Bond cells to backsheet, cushion from vibration |
| 5 – Backsheet | Polymer film (white, black, or transparent) | Seal the back, prevent moisture ingress |
The aluminum frame wraps around the edge of this stack for rigidity. The junction box lives on the back, usually at the centre, and contains the wiring and bypass diodes. Once you picture that cross‑section, the rest of the details fall into place.
The Front Cover – Tempered Glass (What to Look For)
The top layer is a sheet of low‑iron tempered glass, typically 3.2 mm thick in residential panels. “Low‑iron” means it lets more light through than standard glass, the difference is roughly 1 to 2 percent extra transmission. The glass is also heat‑strengthened during manufacturing so it can withstand hail up to 25 mm diameter at 23 m/s (that’s the IEC 61215 test standard).
Most modern panels add an anti‑reflective coating on the glass. Without it, about 4 percent of incoming sunlight bounces off the surface instead of reaching the cells. The coating cuts that reflection to below 2 percent.
You can spot it by looking at the panel from an angle, it often has a slight blue or purple tint, similar to the coating on eyeglass lenses.
What to check when you look at a panel: any visible scratches, chips, or uneven colour on the glass surface. Even small defects can grow into cracks under thermal stress. Also, some budget panels use thinner glass (2.0, 2.5 mm) to save weight, but they’re more fragile during installation.
If you’re mounting panels in a heavy‑snow region, thicker glass is worth having.
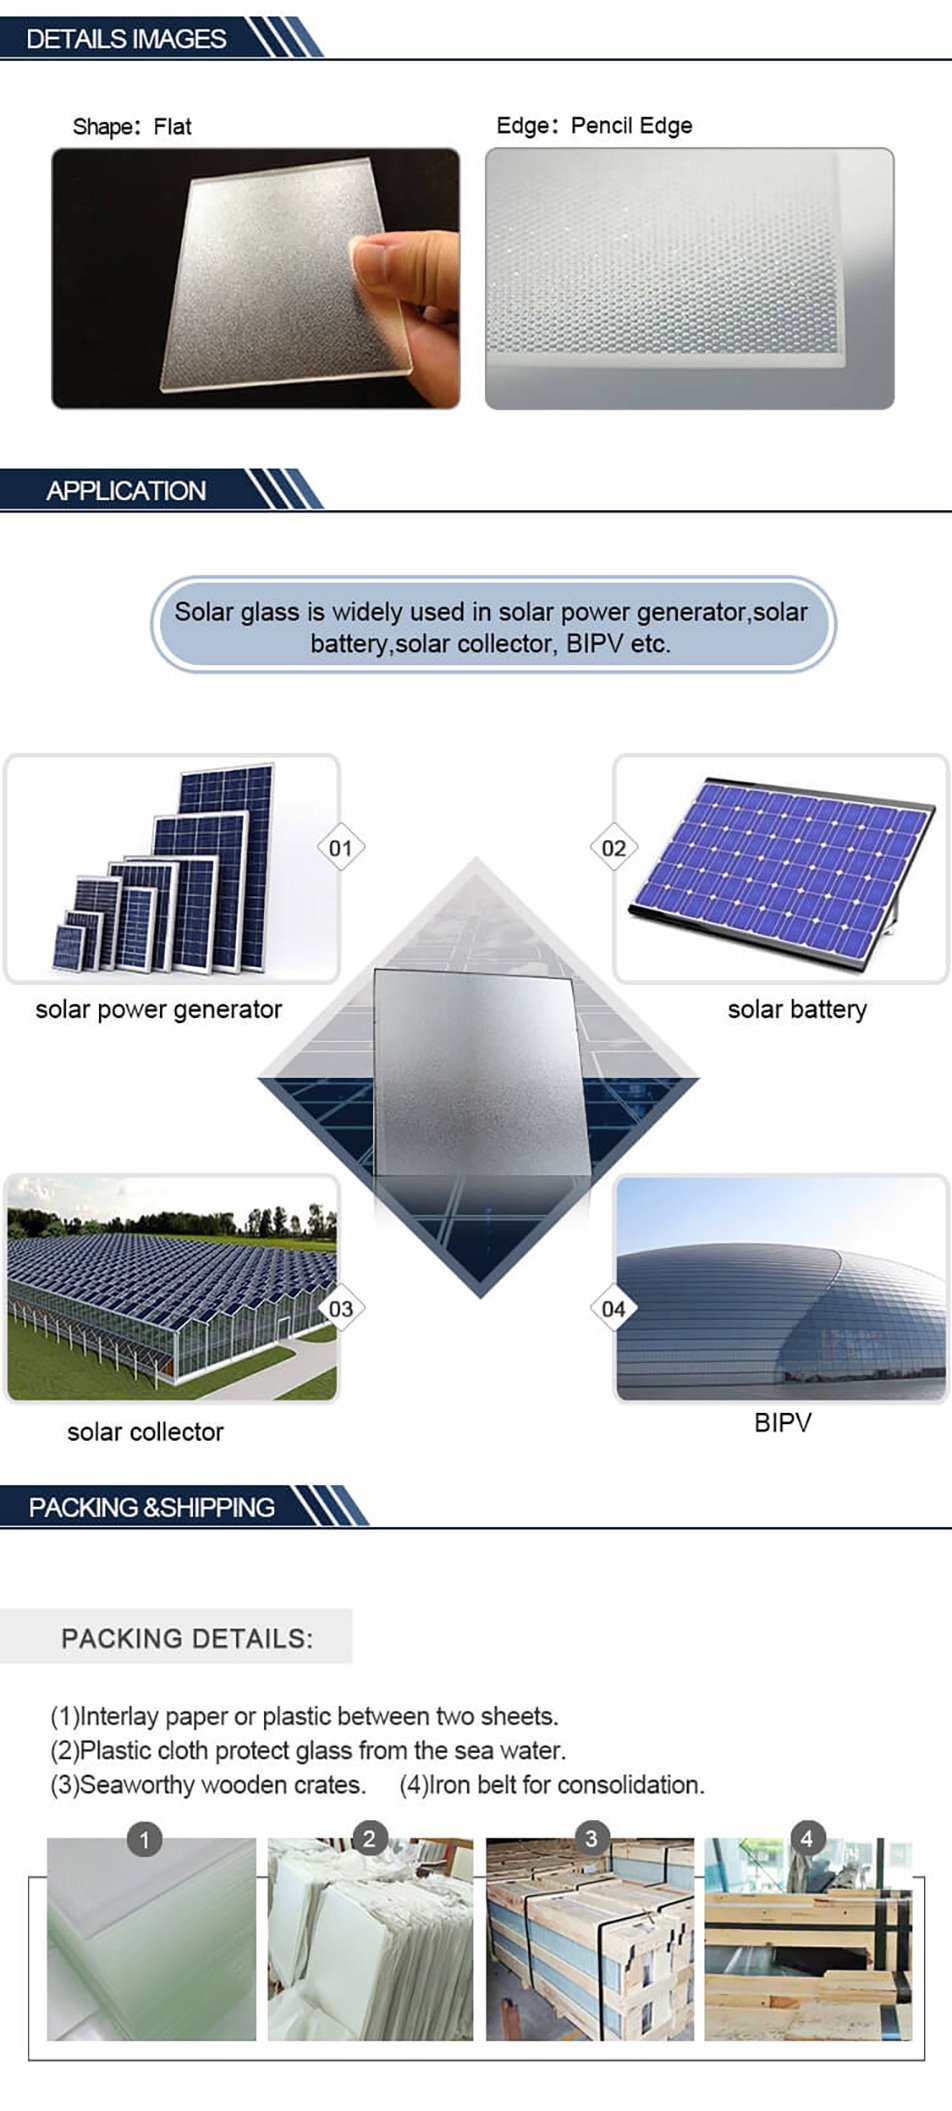
Image source: Bing (Web, fair‑use with source credit)
The Encapsulant Layer – EVA (Why It’s Invisible but Critical)
Beneath the glass sits a sheet of EVA, ethylene‑vinyl acetate, that looks like a clear, slightly rubbery plastic film. During lamination, the panel is heated under vacuum, and the EVA melts, flows around the cell busbars, and bonds the glass to the cells and the cells to the backsheet. Once it cures, it becomes a permanent, UV‑resistant adhesive that also acts as a mechanical cushion.
EVA does two things you can’t see: it prevents moisture from creeping in along the cell edges, and it absorbs the tiny stresses caused by heating and cooling. Over 25 years, a panel undergoes thousands of thermal cycles, from sub‑zero winter nights to 65°C summer afternoons. Without EVA, the glass and cells would separate, and power loss would accelerate rapidly.
The main weakness of EVA is yellowing after many years of UV exposure. High‑quality panels use UV‑stabilised EVA that stays clear for 20+ years. Cheap EVA turns brown around year 8 or 10, which blocks light and drops output.
You can’t tell the difference by looking, but you can often deduce it from the panel’s warranty: a 25‑year linear warranty usually signals better encapsulant. For deeper perspective on panel selection, the buying guide covers warranty details in plain language. choosing the right warranty is one of the most overlooked steps.
The Heart – Photovoltaic Cells (Mono, Poly, Half‑Cut, and More)
The photovoltaic cells are where sunlight becomes electricity. Each cell is a thin slice of silicon, about 160, 200 micrometres thick, doped with specific elements to create a positive‑negative junction. When photons hit the silicon, they knock electrons loose, and those electrons are collected by metal fingers on the cell surface.
You’ll see three main types on the market today, and you can identify them by eye.
Monocrystalline cells are uniformly dark, almost black, with a clean, even colour. They’re cut from a single crystal ingot, which gives them the highest efficiency (typically 19, 22 percent). Residential rooftop panels are almost all mono now.
Polycrystalline cells have a speckled, blueish appearance because they’re made from multiple silicon crystals. Efficiency runs 15, 18 percent. They’re cheaper to produce but take up more roof space for the same wattage.
Half‑cut cells are exactly what they sound like: a standard 156 mm or 182 mm cell is laser‑cut into two pieces. A panel with 120 half‑cells behaves like 60 full cells but with lower resistance and better shade tolerance. If you look closely at a panel, half‑cut cells have a thin laser line down the middle and no busbar on that edge.
The photo below shows the difference between mono, poly, and half‑cut cells side by side.
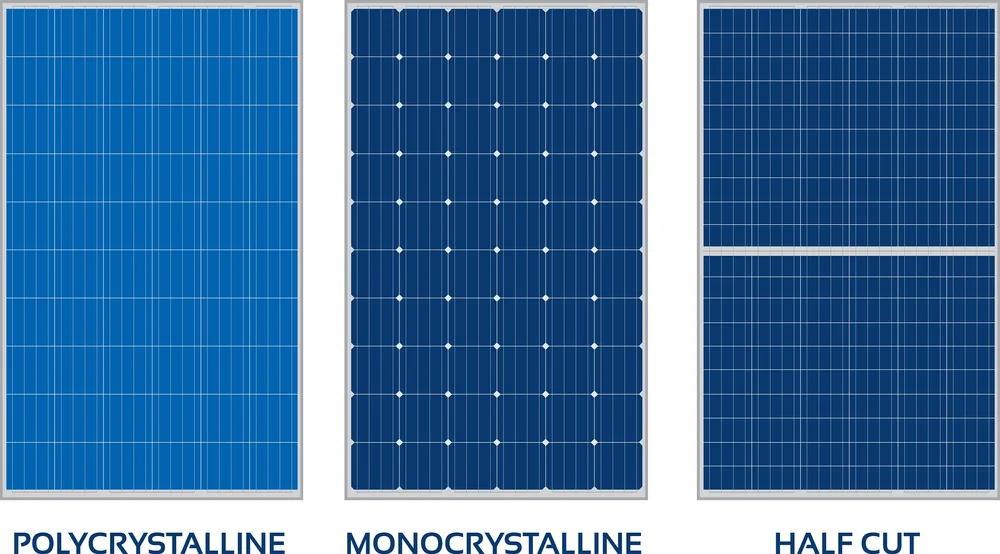
Image source: Bing (Web, fair‑use with source credit)
Beyond these, you’ll also see PERC (Passivated Emitter and Rear Cell) which adds a reflective layer on the back of the cell to capture light that passes through. PERC adds 1, 2 percent efficiency over standard mono and is now the industry default. Newer generations like TOPCon and HJT (heterojunction) push efficiency above 23 percent, but they’re still less common and cost more.
When you’re choosing panels, the cell type directly affects the price per watt and the space you need. Monocrystalline PERC half‑cut cells are the sweet spot for most residential installations as of 2026. For a full breakdown of how cell choice fits into your overall system, the solar panel selection process is worth reading alongside this component guide.
The U.S. Department of Energy’s Solar Energy Technologies Office (energy.gov) also has a good primer on cell efficiency research if you want the technical details.
The Backsheet – White, Black, or Transparent (and What That Tells You)
The backsheet is the white, black, or see‑through layer on the rear of the panel. Its main job is sealing out moisture and protecting the cells from the back side. Most residential panels use a white backsheet because it reflects stray light back up into the cells, boosting output by about 1, 2 percent.
A black backsheet looks cleaner on a dark roof but runs slightly hotter. Dark surfaces absorb more heat, and higher cell temperatures reduce voltage. The trade‑off is purely cosmetic.
Transparent backsheets appear on bifacial panels, which capture light from both sides. If you see a panel with a clear rear and a visible grid of cells, that’s a bifacial design.
The photo below shows a typical backsheet layout alongside the junction box. Notice the white polymer layer and the black junction box mounted at the centre.
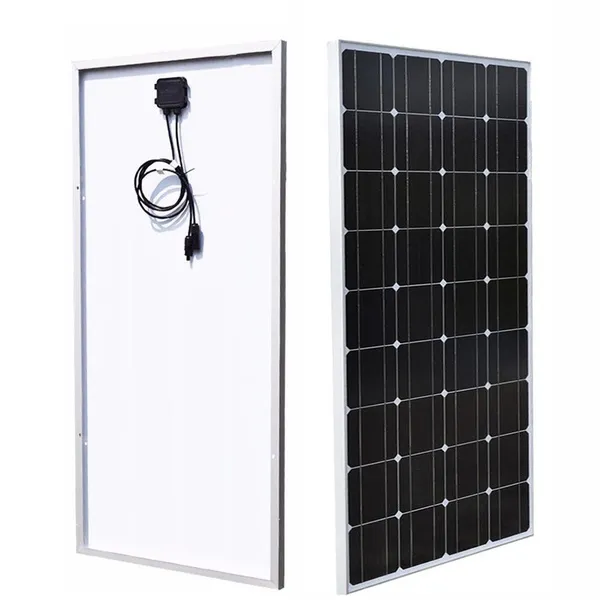
Image source: Bing (Web, fair‑use with source credit)
Backsheet quality varies widely. Cheap panels often use a single‑layer PET film that can crack after 5, 10 years, letting moisture in. Higher‑quality panels use a composite of PVF (polyvinyl fluoride, like DuPont Tedlar) or PVDF (polyvinylidene fluoride) that lasts 25+ years.
You can’t tell the material by looking, but the warranty length is a reliable proxy. A 12‑year warranty suggests a budget backsheet. A 25‑year warranty signals something more robust.
For a deeper look at what to prioritise when comparing specs, the panel buying guide breaks down warranty tiers.
The Frame – Aluminum Structure (Black vs. Silver, Thickness, and Venting)
The frame is an anodised aluminium extrusion that runs around the entire panel edge. It does three things: it gives the panel rigidity so it doesn’t flex in the wind, it provides attachment points for mounting clamps, and it lifts the panel slightly off the roof so air can circulate underneath.
Most residential frames are 30, 35 mm thick. Thicker frames (40, 50 mm) appear on commercial panels rated for higher wind and snow loads. The frame also has small drainage holes at the corners to let water escape.
If you see a panel without drainage holes, skip it, trapped water accelerates corrosion.
Colour matters only for aesthetics. Silver frames are standard and reflect a bit of heat. Black frames blend into dark roofs but absorb more heat, which can raise the cell temperature by a couple of degrees.
That tiny temperature difference has a negligible effect on output in most climates. The bigger concern is the frame’s anodisation quality. Good anodising resists corrosion for 25+ years.
Poor anodising pits and flakes after a decade. NREL’s PV Reliability Group (nrel.gov) has published field studies on frame corrosion in coastal environments if you want the technical data.
The Junction Box & Bypass Diodes (Where the Wires Go)
The junction box is the black plastic box glued to the back of the panel, usually at the centre or near one end. It holds the terminal blocks where the panel wires connect, and more importantly, it houses the bypass diodes.
Bypass diodes are small electronic components that prevent a shaded cell from ruining the entire panel’s output. When a cell is shaded, it becomes a resistor instead of a generator. The diode provides an alternate path for the current, skipping that string of cells.
A panel typically has three bypass diodes, one for each third of the cells. If you see a junction box with only two diodes, the panel is less shade‑tolerant.
The image below shows the inside of a typical junction box with the three diodes clearly visible.
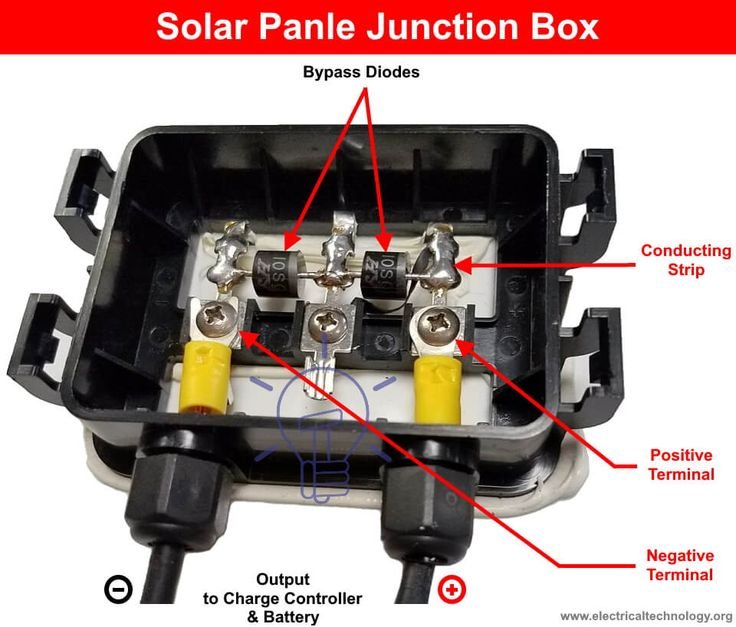
Image source: Bing (Web, fair‑use with source credit)
Junction box failures are one of the top causes of early panel failure. Loose connections, cracked solder joints, or water ingress can cause arcing and fire risk. UL 1703 certification requires junction boxes to pass a 25‑year accelerated weathering test.
Always check that a panel carries UL 1703 or IEC 61730 certification. The solar panel safety guidelines cover what those certifications mean in plain English.
Busbars, Ribbons, and Interconnects (What Connects Each Cell)
Each solar cell has thin metal fingers on its surface that collect the electric current. Those fingers feed into wider strips called busbars, the shiny silver lines you see running across the front of a cell. Older cells had 2 or 3 busbars.
Modern panels use 5, 9, or even 12 busbars, which reduces the distance the current has to travel and lowers resistive losses.
The busbars themselves are made of tin‑plated copper ribbon. After the cells are laid out in a grid, these ribbons are soldered or electrically welded to connect one cell’s front to the next cell’s back, creating a series string. Multiple strings are then connected by longer copper ribbons that run the length of the panel, ending at the junction box.
The close‑up photo below shows the busbar pattern on a modern cell.
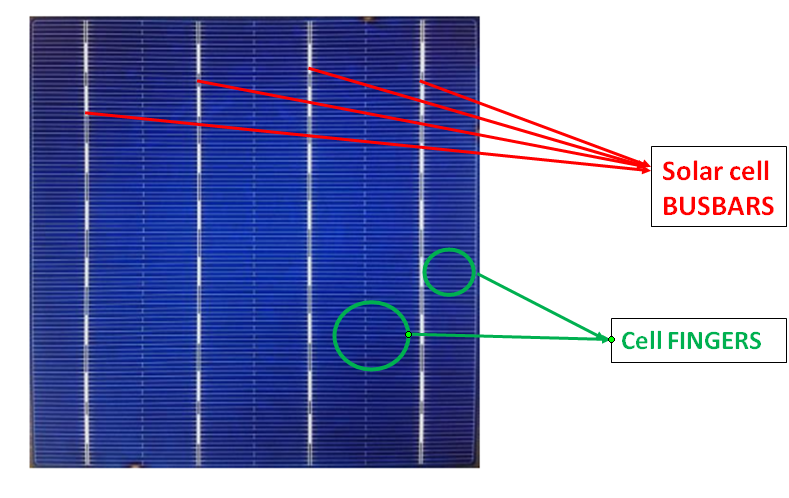
Image source: Bing (Web, fair‑use with source credit)
The number of busbars is a useful visual clue to a panel’s quality and age. Nine or more busbars generally means a newer, more efficient design. Thin, fragile busbars can crack under thermal stress.
Quality panels use thicker ribbons that handle expansion and contraction without breaking. You can sometimes spot broken busbars as faint silver lines that don’t run all the way across the cell, a clear sign of a manufacturing defect or shipping damage.
Common Visual Mistakes People Make (Cracks, Snail Trails, Delamination)
You don’t need a multimeter to spot a failing panel. Several visual clues are obvious once you know what to look for.
Microcracks appear as thin, hairlines across the cell surface, often invisible to the naked eye but visible under bright sunlight or a flashlight. They happen during shipping, installation, or hail impacts. A few microcracks are normal, but a thick spider‑web pattern means the cell is near failure.
Snail trails are brownish streaks that follow the busbar lines. They look like a snail crawled across the cell. These are actually silver migration from microcracks, moisture gets in, reacts with the silver, and leaves a stain.
Snail trails don’t immediately kill power, but they indicate an encapsulant or backsheet flaw that will worsen over time.
Delamination shows up as cloudy or milky patches under the glass. It means the EVA encapsulant has lost adhesion and is separating from the glass or the cell. Once delamination starts, moisture gets in, and the cell corrodes.
The panel is likely done.
Other red flags: bubbles under the backsheet, corrosion on the frame near the mounting clamps, or a yellowed glass surface. If you spot any of these on a panel still under warranty, file a claim immediately. Most manufacturers require you to report physical defects within 90 days of installation.
For a complete rundown of what to inspect before you buy, the inspection checklist in the buying guide is a practical resource.
Key Specs You Can Verify by Looking (Cell Count, Cell Size, Frame Type)
You can size up a panel in about thirty seconds once you know what to count.
Cell count is the easiest check. A typical residential panel has 60 cells (6 rows by 10 columns) or 120 half‑cells. Commercial panels jump to 72, 96, or 132 cells.
Count the rows and columns, half‑cut panels will show twice as many small rectangles with a laser line down each cell.
Cell size tells you how current the design is. Older panels used 156 mm cells (M0 or M2). Modern residential panels use 166 mm (M6), 182 mm (M10), or 210 mm (M12).
Larger cells mean higher wattage per panel but also more weight and a slightly bigger frame.
Frame type is visible at a glance. Look at the frame profile from the edge. A 30 mm silver frame is standard residential.
Thicker or black frames signal either a commercial‑rated panel or a cosmetic upgrade. Measure the frame depth with a ruler if you have access. Anything under 28 mm is likely a budget build that may flex under snow load.
How These Components Affect Your Buying Decision
Knowing the components helps you separate marketing fluff from real value.
For rooftop residential: Look for 120 half‑cut monocrystalline PERC cells, a 30, 35 mm silver frame, a white backsheet, and a junction box with three bypass diodes. That combination balances efficiency, shade tolerance, and cost. Avoid panels with 2‑busbar cells or single‑layer PET backsheets.
Our buying guide has a decision tree that matches these specs to your roof size and budget.
For ground‑mount or commercial: Bifacial glass‑glass panels with a transparent backsheet and 144 half‑cells give higher total yield. The thicker frame and dual glass add weight but improve durability for 30+ year projects.
For off‑grid or RV: Lightweight panels with thin‑film cells or frameless laminates are easier to mount on curved surfaces. You trade efficiency (10, 12%) for flexibility and lower weight. Just double‑check the bypass diode count, cheap thin‑film panels sometimes skip them.
Quick Reference – What Each Part Does in One Sentence
| Component | One‑Sentence Job |
|---|---|
| Tempered glass | Protects cells from impact while letting 98% of light through. |
| EVA encapsulant | Bonds the stack together and blocks moisture. |
| Photovoltaic cells | Convert sunlight into direct current electricity. |
| Backsheet | Seals the rear and reflects stray light back into the cells. |
| Aluminum frame | Provides rigidity, mounting points, and ventilation. |
| Junction box | Houses the electrical terminals and bypass diodes. |
| Bypass diodes | Prevent a shaded cell from dragging down the whole panel. |
| Busbars & ribbons | Route current from each cell to the junction box. |
Frequently Asked Questions About Panel Construction
How many layers does a solar panel have?
A standard panel has five functional layers: tempered glass, top encapsulant, silicon cells, bottom encapsulant, and backsheet. The aluminum frame and junction box are attached afterward.
Is a panel with more busbars always better?
Generally yes, but only up to a point. More busbars reduce resistance and improve current collection. Panels with 9 or more busbars are the current standard.
Beyond 12 busbars, the gains become marginal.
Can a cracked backsheet be repaired?
No. Once the backsheet cracks, moisture has a direct path to the cells. Repairing the crack won’t restore the seal.
The panel should be replaced if it’s still under warranty.
What does a black backsheet do differently?
A black backsheet is purely cosmetic. It makes the panel blend into a dark roof. The trade‑off is slightly higher cell temperature (1, 2°C) which reduces voltage by a fraction of a percent.
How can I tell if a panel uses quality EVA?
You can’t tell by looking, but the warranty is a reliable proxy. A 25‑year linear power warranty usually signals UV‑stabilised EVA. A 10, 12 year warranty suggests cheaper encapsulant that may yellow early.
Do all panels need bypass diodes?
All silicon panels have at least two diodes. Three is standard. If you see a panel with only one bypass diode, it’s either very old or poorly designed.
Skip it.