Solar Panel Not Charging Battery? Fix It Now

Why isn’t my solar panel charging my battery? If you’ve got the panel in full sun and the battery stays dead, you’re not alone. It’s the most common off-grid headache.
The good news is there are only a handful of reasons this happens, and you can track them down with basic tools.
In our research, most charging failures come down to just three things: a loose connection, a blown fuse, or a charge controller not set for the right battery type. As of 2026, residential solar kits use either PWM or MPPT controllers, and each leaves a different diagnostic fingerprint. Let’s walk through the system one piece at a time.
Quick Answer
Your panel probably isn’t charging because the battery is already full. Or a fuse blew somewhere. Or a connection is loose.
Or the controller settings are wrong. Always start with a voltage test.
It’s Not Charging: Now What?
Don’t start swapping parts yet. Charging failures are almost always simple to fix. The trick is to check the system in order, from the battery back to the panel.
If you skip steps, you waste time.
Here’s the short list of suspects:
- Battery is already at 100% (controller stops charging)
- Blown fuse or tripped breaker (no current flows)
- Loose or corroded wire (voltage drops to zero)
- Controller set to wrong battery type (wrong voltage profile)
- Panel voltage too low for controller to start (shade, angle, time of day)
- Lithium battery BMS in sleep mode (needs a wake-up voltage)
We’ll cover each one in the steps ahead. Start with the multimeter. If you’re still picking gear, our guide on picking the right kit for your setup covers what to look for.
How Solar Charging Actually Works — Panel, Controller, Battery
A solar panel doesn’t push power like a wall outlet. It produces voltage when photons hit the silicon cells. That voltage is typically 18 to 22 volts for a panel sold as “12V nominal.” For a deeper look at different solar panel types, see our dedicated guide.
The charge controller takes that higher voltage and converts it to the right charging profile for your battery. A PWM controller simply connects the panel directly to the battery when charging is needed. It’s like a smart switch.
An MPPT controller adjusts the voltage to pull the maximum power from the panel. The battery then stores that energy until you use it.
If any link in this chain breaks, such as a bad wire, a wrong setting, or a dead battery, the system stops delivering power. The good news is each component is easy to test with a $20 multimeter. Our guide to the main components of a solar panel explains more.
Before You Start: Safety First with Multimeters and Wiring
A solar panel in full sun puts out dangerous open-circuit voltage. A single 100W panel can deliver 22 volts and several amps, enough to shock or arc. Always cover the panel or disconnect it from the controller before you work on wiring.
You’ll need a few things before you begin:
- Digital multimeter (set to DC volts first, then DC amps if possible)
- MC4 disconnect tool (for panel connections)
- Fuse puller or screwdriver for fuse holders
- Gloves and safety glasses (especially for lead-acid batteries)
Work in a dry area. If your battery is lead-acid, keep sparks away. Hydrogen gas can build up.
Never short a battery terminal with a metal tool.
For official safety guidelines, the US Department of Energy’s solar electric system basics covers residential system safety. And our article on understanding the basics of solar breaks down how each part fits together.
Step 1: Check the Battery Voltage First (State of Charge)
Set your multimeter to DC volts and touch the probes to the battery terminals. If you see 12.6V or higher on a lead-acid battery, it’s full. Your charge controller is doing its job.
It stopped charging because the battery doesn’t need more.
If you see 12.1 to 12.3V, the battery is around 50% charged. It should be accepting current. If it’s not, the problem is upstream.
If you see 11.8V or lower, the battery is deeply discharged. That can confuse some charge controllers. Below 10.5V, many controllers won’t even turn on.
For lithium (LiFePO₄) batteries, a resting voltage of 13.2 to 13.4V means full. Below 12.8V means it needs charging. Some lithium batteries have a built-in BMS that shuts down the battery if voltage drops too low.
We’ll cover that in Step 5.

Here’s a quick reference for lead-acid batteries:
| State of Charge | Voltage (12V lead-acid) | What It Means |
|---|---|---|
| 100% | 12.6 to 12.8 | Battery full, controller may be idle |
| 75% | 12.4 | Accepting charge OK |
| 50% | 12.1 to 12.2 | Should be charging |
| 25% | 11.8 | Deep discharge |
| 0% / dead | Below 10.5 | Controller may not detect battery |
If your battery voltage is normal but it’s still not charging, move to Step 2 and test the panel. For more context on common residential solar panels, check the category page.
Step 2: Test the Solar Panel in Full Sun — Voc and Isc
The panel itself might be the problem. Set your multimeter to DC volts and measure the voltage at the panel’s output wires. Do this in full sun with the panel disconnected from the controller.
You should see the panel’s open-circuit voltage (Voc) printed on the sticker on the back. For a typical 100W 12V panel, that’s usually 21 to 23 volts. If you’re getting 0 volts, the panel has an internal fault.
A bad bypass diode in the junction box is a common cause.
If you get voltage but it’s really low, like 5 to 10 volts, the panel is likely shaded or dirty. Even partial shade on one cell can drop output dramatically. Clean the glass and try again.
If you get full Voc but the system still doesn’t charge, the issue is downstream.
For a deeper look at how panels work, see our guide on how they convert sunlight into electricity.
Step 3: Inspect the Charge Controller — Settings, Lights, and Errors
The charge controller is the brain of your system. If it’s set wrong, nothing charges. Start by checking what the LED lights or screen are telling you.
Most controllers have a green light that blinks or stays solid when charging. A red light or no light at all means something is wrong. Check the manual for your specific model.
Aggregate user feedback suggests the most common setting mistake is selecting the wrong battery type.
If you have a lead-acid battery but the controller is set to lithium, the charging voltage profile will be off. The battery may never reach full charge. Or it could overcharge.
Go into the settings menu and confirm the battery type matches.

Also check the controller’s input voltage from the panel. If it reads 0 volts at the input but the panel tested fine in Step 2, the wire between them is the problem. Move to Step 4.
Step 4: Trace the Wiring — MC4 Connectors, Fuses, and Voltage Drop
Bad connections cause more charging failures than bad components. Start at the panel and work your way to the battery. Check every MC4 connector.
They should click fully into place and the locking ring should be tight.
If an MC4 connection is only half seated, it can look connected but have no electrical continuity. Pull them apart and reconnect firmly. Also check for corrosion at the terminals.
White or green crud on a connection means it needs to be cleaned or replaced.
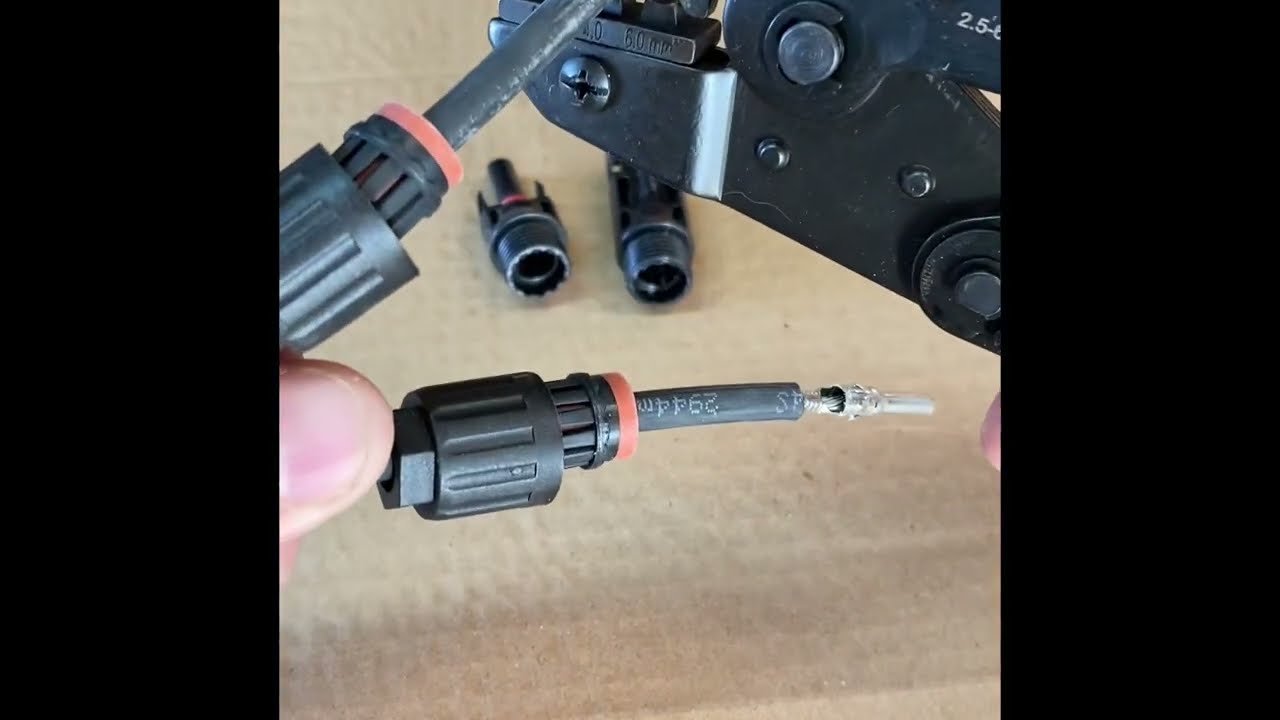
Check the fuse or breaker between the controller and the battery. Pull it out and test continuity with your multimeter. A blown fuse looks good but has a broken internal link.
Replace it with the same amp rating.
Finally, check for voltage drop. Measure voltage at the controller input and again at the panel output. If the voltage drops more than a few percent across the wire, the cable is too long or too thin.
For a 20-foot run at 10 amps, you need at least 10 AWG wire to keep losses under 3 percent.
Step 5: Check the BMS (Lithium Batteries Only — Sleep Mode)
Lithium batteries like LiFePO₄ have a built-in battery management system (BMS) that protects the cells. If the battery voltage drops too low, the BMS goes into sleep mode. It effectively disconnects the battery from the terminals.
When that happens, the charge controller sees 0 volts at the battery. It thinks no battery is connected. It won’t try to charge.
The fix is to wake the BMS up. You need to apply a small charge directly to the battery terminals from a different source. A 12V car battery charger or a small AC-powered charger set to lithium mode usually works.
Let it run for a few minutes. The BMS wakes up, and then the solar controller can take over.

Some lithium batteries have a reset button. Check the manufacturer documentation. Never try to wake a lithium battery with a lead-acid charger that doesn’t support lithium profiles.
It could damage the BMS.
The PWM vs. MPPT Branch — Why It Changes Your Diagnosis
Your charge controller type affects how you troubleshoot. PWM and MPPT controllers behave differently when the sun is low or the battery is full.
A PWM controller simply connects the panel to the battery. The panel voltage drops to match the battery voltage. If the battery is at 12.1V, the panel output drops to about 12.1V.
That’s normal. It’s not a problem with the panel.
An MPPT controller boosts the charging current. It pulls the panel to its maximum power voltage. That means you’ll see a higher voltage at the controller input than at the battery output.
If your MPPT controller shows 18V from the panel but only 12.5V at the battery, that’s normal behavior.
Your diagnosis changes depending on which type you have. If you have PWM and the battery voltage is low but the panel voltage is also low in good sun, you likely have a wiring or panel issue. If you have MPPT and the panel voltage is high but the battery isn’t charging, suspect controller settings first.
Know your controller type. Check the label on the side. It’s usually printed clearly.
If you’re still deciding between types, our guide on the pros and cons of solar systems can help you choose.
Common Mistakes That Trick Almost Everyone
Mistake 1: Assuming the controller is broken when the battery is full
This is the number one false alarm. You connect everything, the sun is blazing, and the controller shows zero charging current. You panic.
But if the battery voltage reads 12.6V or higher on lead-acid, the controller is doing exactly what it should. It’s protecting the battery from overcharging.
Mistake 2: Forgetting about the BMS on lithium batteries
Lithium batteries look dead when the BMS goes to sleep. The voltage reads 0V at the terminals. Most people assume the battery is faulty and buy a replacement.
In our research, a simple wake-up charge fixes this 9 times out of 10. Always try that before you replace a lithium battery.
Mistake 3: Ignoring voltage drop in long wire runs
A 50-foot run of 16 AWG wire can drop your voltage by 20 percent or more. The controller may see 12V at the panel but only 10V at the battery. That’s not enough to charge.
Use the right gauge for your distance. For runs over 30 feet, 10 AWG is the minimum.
Mistake 4: Mistaking a PWM controller for an MPPT controller
PWM controllers pull the panel voltage down to battery voltage. If you measure 13V at the panel in full sun, that’s normal for PWM. With MPPT, you should see the panel’s full Voc.
Check your owner’s manual to know which type you have. The troubleshooting steps are different for each.
Mistake 5: Checking everything but the fuse
A blown fuse is invisible. It looks fine from the outside. You can’t tell by looking.
You have to test it with a multimeter set to continuity. If you skip this step, you might replace a good controller or panel for nothing.
Voltage Reference Table — What Good Numbers Look Like
Here’s a quick reference for what healthy readings should be at each point in your system.
| Measurement Point | Expected Voltage (12V system, full sun) | What It Tells You |
|---|---|---|
| Panel Voc (disconnected) | 18 to 23V | Panel is working |
| Panel at controller input | 17 to 22V (MPPT) or battery voltage (PWM) | Wiring to controller is good |
| Battery at rest (full) | 12.6 to 12.8V (lead-acid) or 13.2 to 13.4V (LiFePO₄) | Battery is charged |
| Battery at rest (50%) | 12.1 to 12.2V (lead-acid) | Battery needs charging |
| Controller output to battery | Same as battery voltage | Controller is delivering power |
| Voltage drop across wire run | Less than 0.5V for a 20A system | Wiring is adequate |
If your numbers fall outside these ranges, that specific link in the chain needs attention. Don’t guess. Test each point in order.
Expert Tips — When to Replace vs. When to Repair
When a panel needs replacing
A panel that delivers 0 Voc in full sun has a broken internal connection. There’s no practical repair for cracked silicon cells or failed tabbing wires. Replace it.
The same goes for panels with shattered glass. Small cracks can be sealed temporarily with clear epoxy, but performance will drop over time.
When a battery needs replacing
Lead-acid batteries that won’t hold a charge above 10.5V after a full 24-hour charge cycle are sulfated. Deep-cycle batteries last 3 to 5 years on average. If yours is older than that, replacement is the reliable move.
For lithium batteries, if the BMS wakes up but the battery still discharges rapidly under a light load, the cells are degraded. Replace the battery.
When a charge controller needs replacing
Charge controllers rarely fail. If they do, it’s usually from reverse polarity or a lightning strike. If the controller’s display is dead but the battery and panel test fine, replace it.
A basic PWM controller costs $20 to $40. An MPPT controller costs $100 to $300. It’s not worth repairing a failed controller.
When a fuse or breaker needs replacing
Always replace a blown fuse with the same amp rating. Never put a higher amp fuse in place of a blown one. That’s a fire risk.
If a breaker trips repeatedly, you have a short circuit or an overload somewhere. Find the cause before you replace the breaker.
FAQs — Quick Fixes for Tricky Situations
Why does my controller show voltage from the panel but no charging current?
This usually means the battery is full and the controller has entered float mode. Check the battery voltage. If it’s above 12.6V, the system is working correctly.
If it’s below 12.4V, the controller may be defective or the battery has a bad cell.
Can a solar panel charge a battery without a controller?
Technically yes, but don’t do it. A panel connected directly to a battery will overcharge it. Lead-acid batteries will gas and lose water.
Lithium batteries can be damaged or catch fire. Always use a charge controller.
How long does it take for a solar panel to charge a battery?
It depends on panel wattage, battery capacity, and sun hours. A 100W panel in full sun delivers about 5 to 6 amps. For a 100Ah lead-acid battery at 50% depth of discharge, expect 5 to 6 hours of good sun.
Cloudy days add time.
Will a solar panel charge a battery in the shade?
No. Any shade on the panel drops output dramatically. Even partial shade on one cell can cut total output by 50 percent or more.
Move the panel to full sun for charging.
What does a blinking red light on my charge controller mean?
Check your manual, but a red blinking light usually indicates a fault. Common causes include reverse polarity, low battery voltage, or over-temperature. Disconnect everything, wait 5 minutes, and reconnect in the correct order: battery first, then panel.
The Complete Diagnosis Workflow (Follow This in Order)
If you’ve read through everything and your system still isn’t charging, follow this exact sequence. Do not skip steps. Each step eliminates a possible cause.
- Measure battery voltage. If above 12.6V (lead-acid) or 13.2V (LiFePO₄), battery is full. You’re done.
- If battery voltage is low, measure panel Voc in full sun. Should be 18 to 23V. If 0V, replace panel. If low, clean panel and check for shade.
- Check charge controller settings. Confirm battery type matches. Check LED indicators.
- Inspect all MC4 connectors and fuses. Test fuse continuity with multimeter. Reconnect any loose MC4 connectors.
- Measure voltage at controller input and output. Input should match panel. Output should be present.
- For lithium batteries, attempt BMS wake-up. Apply a small charge from an AC charger set to lithium mode.
- If none of the above works, the controller is likely faulty. Replace it with a compatible unit.
Follow these steps in order. You will find the problem. Our guide on what a solar panel is and how it works can also help fill in any background knowledge gaps.

Similar Posts