How Solar Thermal Captures the Sun’s Heat
Renewable Energy Systems Specialist & Lead Solar Hardware Tester
You have seen solar panels on roofs. But some of those roofs have something slightly different. They are solar thermal collectors.
And if you assumed they make electricity the same way, you are not alone. So, how does solar thermal work? It is a completely different process, and it is surprisingly simple once you picture the loop.
Manufacturer specifications show that a standard flat-plate collector converts 52 to 58 percent of incoming sunlight into usable heat. That is roughly three times the efficiency of standard solar electric panels. The catch is that you can only generate heat, not electricity.
The difference becomes clear the moment you look at a system diagram.
Why Visuals Matter First
If you try to understand solar thermal from text alone, you will get lost. The system is a loop. You need to see the collector, the pipes, the pump, and the tank all connected together.
A single diagram makes it click instantly.
The real magic happens inside the plumbing. The collector looks like a box or a set of glass tubes. But the heat exchange happens in a coil inside your tank.
That is the part most people miss. Without a visual, it is hard to grasp that the fluid circulating in the pipes is never the water you shower with. It is a separate, closed loop.
A good installation diagram shows four things clearly. You see the collector mounted on the roof. You see the insulated pipes running down.
You see the pump station mounted on the wall near the tank. And you see the tank itself with its internal coil. A photo of a cutaway tank wall reveals that copper coil sitting inside the water.
Here is what you should look for in any diagram you come across:
- The collector (flat plate or evacuated tube) on the roof
- Supply and return pipes with insulation
- A pump station with a visible flow meter and pressure gauge
- A storage tank with a heat exchanger coil inside
- An expansion tank connected to the piping
- A small controller box with two temperature sensor wires
Per SRCC OG-100 testing standards, collector efficiency drops as the temperature difference between the collector and the tank rises. That detail makes more sense when you can map it to a picture. You see the hot collector and the cooler tank.
Then you understand why the controller only runs the pump when the collector is hotter by a set amount, usually 8 to 15 degrees Fahrenheit.
Quick Answer
Solar thermal works by trapping sunlight as heat. A collector absorbs the sun energy. A fluid carries that heat to a tank.
A controller decides when to run the pump. The stored hot water is ready for use. You still need a backup heater for cloudy days.
Core How It Works — The Loop You Need to Picture
The system has three main parts. They work together in a simple loop. Here is how each part fits into the process.
| Component | Role | What it looks like |
|---|---|---|
| Solar collector | Absorbs sunlight and converts it to heat | A flat box with glass on top, or a row of glass tubes |
| Storage tank | Holds hot water and contains a heat exchanger | A large insulated cylinder, similar to a standard water heater |
| Differential controller | Decides when to run the pump | A small electronic box with two temperature sensors |
The collector sits on the roof. Sunlight passes through the glass and hits a dark absorber plate. That plate gets hot.
A fluid, usually a mix of propylene glycol and water, flows through tubes attached to the plate. The fluid picks up the heat.
The fluid then travels down to the tank. It passes through a heat exchanger coil inside the tank. The heat transfers from the fluid to the water in the tank.
The cooled fluid returns to the roof to pick up more heat.
The differential controller is the brain. It has one sensor on the collector and one sensor inside the tank. The official guidance from the U.S.
Department of Energy confirms the logic: the controller compares the two temperatures. When the collector is hotter than the tank by a set difference, it turns the pump on. When they get close, it stops the pump.
This is where standard electricity-generating panels differ. They send electricity to an inverter. Solar thermal does not generate electrons.
It simply moves heat from one place to another.
Key Components, Visual Guide
The two most common collector types look very different. Knowing what to look for helps you spot them on a roof.
| Collector type | Visual identifier | Best use |
|---|---|---|
| Flat-plate | A rectangular box with glass on top, about 1 meter by 2 meters | Moderate climates, good cost efficiency |
| Evacuated tube | Rows of parallel glass tubes, each about 2 meters long | Colder climates, higher temperature output |
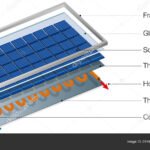
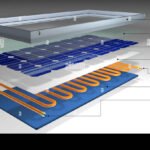
Flat-plate collectors have a black absorber plate under glass. The glass traps heat like a greenhouse. The absorber has a selective coating that captures sunlight well and loses heat slowly.
You can see the copper tubes running across the plate if the glass is clear.
Evacuated tube collectors look like a row of thermos bottles. Each tube is a double glass tube with a vacuum between the layers. Inside is a metal heat pipe or a direct flow tube.
The vacuum provides excellent insulation. These tubes perform better on cloudy days and in very cold weather.
The storage tank is where the water sits. It looks like a standard water heater but is usually taller and better insulated. Inside, there is a heat exchanger coil.
In a typical two-tank system, you have one solar preheat tank and one backup gas or electric tank. In a single tank system, the backup heater is built into the top of the tank.
The pump station is a small assembly near the tank. It holds the pump, a flow meter, a pressure gauge, and isolation valves. You can see the flow meter spinning when the system is running.
The expansion tank is a small round tank connected to the piping. It handles pressure changes as the fluid heats and cools.
The different collector designs each have their own installation requirements. Flat plates are simpler to mount. Evacuated tubes are heavier and need stronger roof support.
Both use the same basic piping and control setup.
Common Visual Mistakes People Make When Looking at a System
The biggest mistake is confusing a solar thermal collector with solar electric PV systems. At a glance, a flat-plate collector can look like a PV panel. But PV panels have a dark grid of individual cells.
Thermal collectors have a solid dark absorber under glass with visible copper tubes. If you see a box with glass and no grid pattern, it is probably thermal.
Here are other mistakes to watch for:
- Assuming more collectors always mean more hot water. Oversized systems stagnate and overheat. The collector area must match the tank volume and your daily hot water use.
- Thinking the tank receives direct sunlight. The tank sits indoors, usually in a basement or utility room. Only the collector is on the roof.
- Overlooking shading. A single tree branch that shades one corner of a collector can cut output by 20 to 30 percent. Shade on a single tube in an evacuated tube system kills that tube completely.
- Forgetting the backup heater. Solar thermal covers 50 to 70 percent of annual hot water needs. You still have a gas or electric heater for cloudy stretches and high demand.
- Missing the difference between open loop and closed loop. Open loop systems circulate household water directly through the collector. Closed loop systems use a separate fluid. Closed loop is safer in freeze prone areas.
- Assuming the pump runs all day. It only runs when the collector is hotter than the tank. On a cloudy morning, the pump may not run at all.
Comparing the trade-offs between these two system types matters. Open loop is simpler and more efficient, but it fails in hard water areas. Closed loop protects against freezing but needs glycol replacement every three to five years.
A quick visual check of the piping near the tank tells you which type you have. If you see a separate fluid fill port and a pressure gauge, it is a closed loop.
A quick way to spot the difference: if you see a small tank hanging off the piping near the pump station, that is the expansion tank. Open loop systems do not have one.
Step-by-Step — How to Commission a System (What a Pro Checks)
Getting a solar thermal system running properly takes more than just connecting pipes. The difference between a system that delivers 60 percent of your hot water and one that barely works comes down to the commissioning steps. Here is what a pro checks before calling the job done.
Inspect the collector mounting and tilt. The collector needs to face south in the Northern Hemisphere. The tilt angle should equal your latitude, give or take 10 degrees. A pitch that is too flat collects less sun in winter.
A pitch that is too steep loses summer output. The roof itself must support the weight. A single flat plate collector with fluid weighs about 150 to 200 pounds.
Two collectors need a structural check.
Pressure test the closed loop. Before adding any fluid, the installer fills the loop with air or water at 1.5 times the system's working pressure. Usually that means 50 to 60 psi. They wait 15 minutes.
If the pressure holds, the loop is tight. A leak in the piping buried inside a wall or under insulation is a nightmare to fix later.
Purge air from the lines. This is the step that trips up first timers. Air in the closed loop causes the pump to run dry. It can also create air locks that stop flow entirely.
The pro opens a bleed valve at the highest point in the piping loop while the pump runs. Air bubbles hiss out. Once a steady stream of fluid appears, they close the valve.
Set the differential temperature on the controller. The controller comes factory set with a default differential, usually around 12 degrees Fahrenheit. But the optimal setting depends on your collector type and tank size. Per the U.S.
Department of Energy guidelines, a good starting point is 8 to 10 degrees for flat plate collectors and 6 to 8 degrees for evacuated tube models. The controller also needs a maximum tank temperature setting, typically 140 to 160 degrees Fahrenheit.
Verify flow rate. A small flat plate collector needs about 0.5 to 1 gallon per minute of flow. Evacuated tube collectors need slightly less, around 0.3 to 0.5 gpm per tube row. The flow meter on the pump station shows the actual rate.
If it is too slow, the fluid overheats. If it is too fast, the fluid does not pick up enough heat.
Check freeze protection with a refractometer. The propylene glycol mix needs to be at the right concentration. For most climates, that means a freeze point of minus 20 to minus 30 degrees Fahrenheit. The installer uses a refractometer to measure the glycol concentration.
A reading that is off by 5 percent can mean a frozen and cracked collector next winter.
Final functional test. The pro covers the collector with a cloth or walks away for an hour in the sun. When they return, the collector should be hotter than the tank. The pump should have run at least once.
The pressure gauge should show steady pressure. The flow meter should show movement. If everything checks out, the system is commissioned.
This whole process takes a skilled installer two to four hours on a typical residential system. Rushing it or skipping steps is the main reason systems underperform or fail early.
FAQ — What People Actually Ask
How long do solar thermal collectors last?
Manufacturer warranties typically run 10 years for flat plate collectors and 10 to 15 years for evacuated tube models. In practice, many collectors last 20 to 30 years. The storage tank lasts less time, about 10 to 15 years.
The glycol fluid needs replacement every 3 to 5 years.
Do solar thermal systems work in winter?
Yes, but output drops significantly. In a northern climate, expect a solar fraction of maybe 15 to 25 percent in December and January. The collectors still capture diffuse light on cloudy days.
The system just runs the backup heater more often. Evacuated tube collectors perform noticeably better in winter than flat plate models.
Can I install a solar thermal system myself?
Technically possible, but strongly not recommended. The closed loop needs precise pressure testing and air purging. The glycol mix requires a refractometer check.
The electrical connections for the pump and controller are straightforward, but one mistake in the plumbing can cause a flood or a freeze damage event. Most reputable installers also require professional installation for warranty coverage.
Do I still need a regular water heater?
Yes. Solar thermal systems are designed as preheaters. They heat the incoming cold water before it reaches your main water heater.
On sunny days, the solar tank supplies water at 120 to 140 degrees Fahrenheit, so the backup heater never fires. On cloudy days, it provides warm preheated water, so the backup heater works less hard. You never truly eliminate the backup unit.
What happens if the pump stops?
The fluid in the collector gets very hot. In a properly designed system, the fluid reaches stagnation temperature, typically 300 to 400 degrees Fahrenheit. The pressure relief valve opens briefly to release pressure.
The glycol degrades faster during stagnation events. A well designed system includes a heat dump mechanism or a larger expansion tank to handle repeated stagnation.
How much can I save on my energy bills?
Typical savings range from 30 to 70 percent of your water heating costs. For a family of four using a gas water heater in a moderate climate, that means roughly 150 to 300 dollars per year in savings. With current federal tax credits covering 30 percent of installation costs, payback periods run 5 to 15 years depending on local fuel prices and sunlight levels.
Maintenance and Long-Term Optimization
A solar thermal system needs very little annual upkeep. But the few tasks it requires are critical. Skip them and you risk freezing damage or a failed pump.
Check the freeze protection level every fall. Use a refractometer. The glycol concentration should protect down to at least minus 20 degrees Fahrenheit. Aggregate installer feedback reports that degraded glycol is the most common cause of collector damage.
A simple test takes two minutes.
Inspect the pressure gauge monthly. The closed loop should hold steady at 20 to 40 psi when cold. A slow pressure drop means a leak. A fast rise means stagnation or a failed expansion tank.
Clean the collector glazing once a year. Dust, pollen, and bird droppings block sunlight. In dry areas, a single season of dust can reduce output by 10 percent. Use water and a soft brush.
No harsh chemicals.
Listen for the pump. It should hum softly when running. A grinding or rattling noise means the bearings are wearing out. Pump replacement is a diy friendly job for a handy homeowner.
The pump itself costs about $100 to $200.
Replace the glycol every three to five years. The fluid degrades over time. It becomes acidic and loses its freeze protection. A system flush and refill costs $200 to $400 from a pro.
It is worth doing.
Check the anode rod in the storage tank every two years. Solar tanks have sacrificial anode rods just like standard water heaters. If the rod is eaten away, the tank will rust. Replace it before the tank leaks.
A little attention each year keeps the system running at peak efficiency. Neglect it and you will face repairs that eat up years of energy savings.

Similar Posts